Sunday, November 7, 2010

Aha....an update....

Man, I have been busy...so, grab a coffee or tea and sit back...this is going to be a long post.

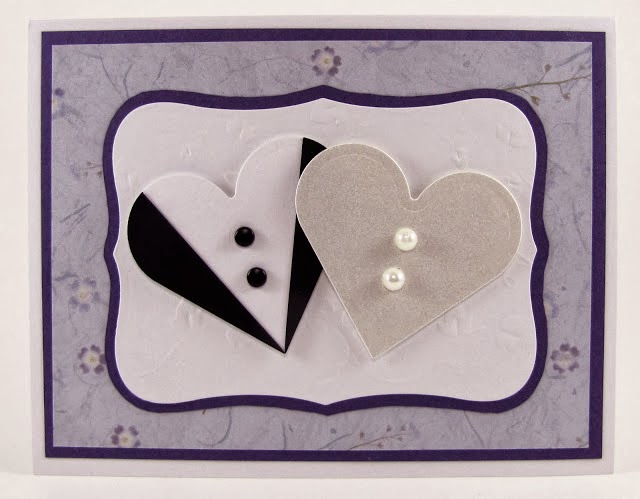
Weddings...my nephew got married the September long weekend and I volunteered to make his wedding invitations. Surfing the internet looking at ideas I came across this website and she was a fountain of information.


These were so simple to make but man, did they really look elegant! I really suck at stamping so the sentiment and the monogram were done on my laser printer. I love the little crystal in the "H" on the monogram and I put a matching crystal in the "T" of Thank You, too. Black and white card stock was on the usual sale and I stocked up on the ribbon when it was on clearance. What was nice was that I really over bought and I got to return what I didn't need to the store (always keep your receipts, girls).

Of course, there were cards for the attendants also. Michael's wanted an arm and a leg for their dimensional stickers and I found a website (Scrapbookingcafeonline) where I got all the stickers I needed plus shipping for the price of one...yes I said one...sticker at Michael's. So...why would I ever buy a sticker there again!

My niece-in-law sent me pictures of her bridesmaid dresses and I so happened to have the exact Copic markers....so, I colored the white dress and ribbon sticker to match. This was pretty close to the flower girl dresses. I just had to add the ribbon that spanned across the width of the dress.


He is so cute! This is just a clip art I got off the internet. I colored his coat, tie and the heart with Spica pens. I added a gem for his button and two jump rings for the ring pillow.

This was another find on the internet. I was searching for tuxedo cards and came across this website. It took a bit to figure everything out...and, everyone loved their cards!

I had been reading and looking at 'explosion boxes' so...I thought I would try to make one for my nephew and niece-in-law.


I "borrowed" pictures from their Facebook photo album and got to work. I did two layers...one layer black and white photos and the other layer with colored photos.


The following weekend my receptionist got married. She was having a cupcake tree and I asked her if she needed cupcake wrappers, "Nope", she said. "Yes, you do", I said. When they came over on the weekend to put things together I met her and her fiance at the door with a plate. On one side was three mini cupcakes with no wrapper and three on the other side with wrappers....she got my point! Besides, I finally got to play with my Gazelle.

That was another issue...I really haven't had a chance to play with my pink machine and I was just trying to wing it. Along comes Terry Mouw from Bosskuts....without her invaluable help I would not have done this at all (even though I really, really wanted to do this).


Her cupcake tree looked so awesome! The cupcake wrappers made a huge difference and it just gave it a "finished" look.


Of course, I volunteered when she was having trouble with her printing. I scanned her wedding invitation (damask pattern) and created her wine bottle label and favor tags in the same pattern.


Now, I guess I really do not have any spare time on my hands because I offer to make her attendant cards. Back to Scrapbookingcafeonline to get more stickers. A Spellbinders Nestability Label 10, white velvet and black gems later I have this awesome card. I included the small easel stand with each one so they could stand up properly.
This sticker was identical to the flower girl dresses. It wasn't until I was at the wedding that I realized I forgot to color the ribbon black. Oh well, I managed to get one done correctly. One of the girls lost her card and was devastated. I had a spare sticker so I made her one to replace her lost one and....this time the ribbon was black!


And no, I do not sleep! At least, around this time it sure felt like it. I wanted to do another explosion box. I was surfing one day and I found this website. I picked up the Sizzix Bigz Cake Die and proceeded to put this together. I am so pleased with how it turned out!


Back to Facebook for photos again and I printed two layers...this time, all black & white. I slit one card stock layer and this made a great spot for a gift card. See the little butterfly...tug on that to get the gift card!


My friend's daughter was having a baby shower (see the Burnished Velvet heart invitations from last year) and I of course, volunteered to make the shower cards. I don't have a picture of it yet, but it is a pink version of the one I made for my daughter's baby shower. I made baby booties for party favors and I just had to make another explosion box.


This one is in the baby's nursery colors (yep, it's a girl). The pink paper used to form the sides of the box lose their detail in the process...it is embossed with little bears etc....just darling!


I think that is enough for now....my next project is wedding invitations for "Number 2" son. I made up the template and I am waiting approval from the bride. I will post them when I make the final version.
Between crafting...dealing with water in our ductwork since March...we are on a cement slab and water managed to find it's way into our floor heating vents. We finally, finally found the problem....water main leak - yeah, house insurance.

Christmas cards next weekend....man, this never ends! Have a great day.

Cat

Saturday, October 2, 2010

My first challenge...

I did it...I did it. I finally found a spare minute to make a card that I could enter into a challenge.

Oct. 1 – ssnotime159 – Three is the Number – Today’s challenge calls for us to think in 3’s. Your project should incorporate 3 panels (as in background panels) OR 3 images (as in the focal point). Things always look pleasing to the eye when grouped in 3’s, so let’s see what kind of eye-pleasing trios we can come up with today!

Well, it is a friend's birthday and while I was putting together her card for tonight I noticed that it fit...so, here it is.
I love the Lazy Dayz 3d sheets and this so suits my friend! Now I just have to figure out "Mr. Linky"!!!


Wednesday, September 8, 2010

Still here....

I have been so busy with weddings and baby births....yep, I am a grandma! Bouncing baby boy Dezmond Alexander Gunn arrived on the 19th of August...weighing in at a whopping 9 lbs. 11 oz. Healthy and happy and mom, dad and baby are doing just fine.

Number 1 grandson, Nolan turned 1 year old on August 31st. I can't believe it has been a year already.

Anyway...back to work. I have pics and stuff coming in the next little while.

Have a great day

Saturday, June 26, 2010

New cards....

I have been busy working working and working on a surprise for someone. I took some down time last night and whipped up two cards.

Before I get to that...I saw a card on Scrap Bitz blog and....as I had just picked up the Karen Lockhart stamp she used it was a perfect opportunity to make a card for dad and get it mailed off to him.

I found a poem on the internet from a daughter to her father and I used it to make my own background paper. I love the English leather-like paper and the royal blue is a glorious colour. I used Diamond Glaze over the ocean to give it some gloss, used Stickles (for the first time ever - hoarder!) on the sun rays and, after a quick trip to the fabric store...twill ribbon.

I am so proud of my colouring (thanks Suzanne Dean for your Copic Class) and how this card turned out. Dad called and he was really touched.


Now, for the other two cards! One is for a friend's daughter who is finally pregnant. I waited until I knew everything is just fine and in her third trimester (no tempting fate here). I found a tutorial on the internet how to get perfect circles and this card just blossomed from there.


This one I found on the internet and fell in love with the simple, but elegant, design of it.


Last night a friend asked me why wasn't I on Etsy and selling my cards. I told her I can't sell my cards. 99.9% of the time they are "cased" (seeing someone else's work on the internet...falling in love with it... and copying/modifying it a bit for personal use). I know of some people whose cards are being sold as that person's idea and I find this practice totally reprehensible.

I am so brain-dead when it comes to having an original idea. I call myself "paint by numbers". I know I have made some cards that a store really wants to sell and they are my original idea....I just can never seem to find the time to work on them. Oh well, by the end of the summer all my craft promises will be fulfilled and I can devote some time to them.

Until then, I hope everyone sees sunshine.

Cat

Copic Marker Storage...

I have been searching, it seems like forever, for a Copic marker storage solution. I know a lot of posters like the "cubby" style of storage but, I like my markers in colour chart order --- and portable. I was keeping them in the standard Copic marker container...but, I have three of them and that meant multiple trips if I wanted to work in a different room.

One day I was blurfing and I saw a post how one person likes hers in a storage crate. Well, off to Michael's I go and ....no storage crate. However, they did have a beautiful basket that was perfect in size. I put some of that non-slip material down and it holds all three of my copic containers. All my colours are in perfect (for me) order and I love that I can just carry it from room to room now.


Saturday, June 5, 2010

Cuttlebug Embossing Folder Storage....

I am really on a "tear" organizing my craft area. I am liking the way it is going!

Up until now, I have been keeping all my small dies and embossing folders in a binder. However, I seem to have outgrown it. My hubby says to stop shopping and my response is, "WHAT...are you nuts?"


I "googled" and found one poster on Splitcoast Stampers who stored hers in a wooden crate. Off to my local Michael's...no crate...but, they did have the cutest storage boxes that work perfectly. In fact, I grabbed a bunch of them as one now holds all my Thomas Kinkade stamps, one holds my Tim Holtz and Sizzix dies etc. They are about 6-1/2" wide and 12" deep --- perfect!

As everyone seems to be coming out with 5x7 embossing folders (and I am accumulating some now) I wanted to create the file dividers (8" x 6-1/4") and cut "1/3 cut" tabs. The dividers end up being 7" x 6-1/4". I typed labels for them and then I cut three 8"x6-1/4" coloured dividers to separate the brand (i.e. Cuttlebug, Sizzix, Crafts-too-you). I like this better as I can keep the sets together now (i.e. Sizzix Wedding Set).


Gee....I am so organized! Next project: I picked up the Tim Holtz tag die and I am going to cut out a bunch of tags on cheap cardstock, emboss each tag with a different folder and put them all on a ring to create a swatch. This way, I can bring out my swatch to see which folder I want to use and then I can go to the box and get the folder....simple!

Okay, off to find something to eat. Then I am going to set down and play with the new Cuttlebug Quilling kits. These are so addicting....

Oh, the sun is shining!

Tuesday, June 1, 2010

Photo Tent

I got really tired of having to photoshop all my photos...trying to find a good setting...and, tired of waiting until a sunny day to take pictures of my cards etc.

I "googled" DIY photo light boxes and tons and tons of ideas and instructions appeared. I went with the one here. It was not difficult at all and I think my photos are turning out great.

I modified it a bit by opening up the box on one side so it laid flat, sprayed glue on it and glued white poster paper on top of it. This way, I had a perfectly white interior. I then cut out the window holes, put white medical tape (all I could find) around the window edges and corners of the box where the brown of the box shows and taped tracing paper over the edges. I then cut poster board to fit the inside and I now have a light box. I also bought blue, black and gold so I could change my background if I wanted.

I bought two cheap ($10.00) lamps from Canadian Tire and the daylight true colour light bulbs for it. I am playing around with having my standing Ott lamp shine down on the top to see more about shadows. Given time, I think I can end up with professional quality photos for my blog.

This picture is not so great as I took it with my broken camera but, it is good enough that you can see the setup with my new camera.

It gives you an idea of what it looks like.

Hoping you are having a dry day!

Cat

It's raining...it's pouring....

Okay, enough already. I feel like I should be in the yard building an ark! On the good side, we have no leaks in our duct work....we are dry, dry, dry! I guess flushing the existing weeping tile system, digging a trench away from one corner of the house and putting a rain barrel under the other drain pipe worked.

I have been a busy bee creating something --- I can't say anymore about it because I know someone reads my blog and it is a secret!!! I will post pictures etc. when I can.

My daughter is due towards the end of August and we are having a baby shower for her in Kelowna on July 31st. I "googled" the internet and found a pattern for a "onesie" and this is what I ended up with....

I did not have the Stampin' Up 1-3/8 punch the pattern called for so I used my Marvy 1-1/2 punch and I think it turned out just fine. The card is an A2 size and it is adorable.


We got a phone call from No. 2 son and he and his girlfriend announced their
engagement. No details on the wedding date etc. but, we do know, it will not be this summer. Thank heavens as it is turning out to be a really busy one....with camping, a party for my daughter's marriage on Vancouver Island, a motorcycle trip, the grand baby's birth (both moms are going to be in the delivery room) and our other grandson, Nolan's first birthday a week or so later. Sheesh, busy, busy!

I do not have any "girlie girl" friends or family and when Ray announced his engagement, I let out a "Yippee" because Amanda is a "girlie girl". She loves ribbons, bows, flowers etc. and I sat down and made a card for her. I found the idea for it on Becca's blog (Amazing Paper Grace) and I immediately drove to Michael's to get the punches. I did not have the Just-Rite stamp for the border so, I cheated until my order comes in (new releases). I found a picture off the internet, sized it, traced it with my light box, altered the colour etc. in my graphics program, added the sentiment and hit "Print". I coloured the flowers and leaves with my Spica pens. Now I need to get it into the mail.

I pulled a rib bone under my shoulder blade (don't ask me how...I have no idea) and it has been a couple of days of chiropractor and massage therapy and no work (which means no pay cheque, of course). It has been a struggle to type and I am glad I am now done.

Still raining here and still hoping you are having a dry day where you are.

Cat


Sunday, May 16, 2010

Ribbon storage solutions....

I am tired! I am sore! I am done!

I have spent the past week and all weekend (minus a few shopping sprees) cleaning and sorting and organizing my craft room. I have let it go to pot ***pause while we wait for the cat to figure out how he is going to lie in front of the monitor***. I was busy making wedding invitations for my nephew and niece-in-law and the room got away from me. Plus, I was making purchases and not putting them away.

I like to have everything detailed in a binder because my hubby calls me "the Queen of returns". I have a tendency to purchase more than one of an item. I now have a binder with all my dies, folders, pens, inks, punches etc. listed so I do not buy two again. However, buying things means putting the details into the binder and.....as I was lacking in energy and time doing so, they sat on my work table until I finished last night.

I also admit to being a ribbon hoarder and I ran out of room. I had my ribbons sorted into colors and stored in shoe boxes but, I was up to ten shoe boxes and no room left for more purchases or storage. Along comes Becca from Amazing Paper Grace and an organization tip from her.

I searched until I found the proper 3-drawer storage unit and I wrapped and I wrapped and I wrapped until all ten boxes were now confined to one small drawer unit....which.....inspired me to reorganize and resort what I did have.

This is the ribbon system I now have.... Hubby says supper is ready so, I am off!


Tuesday, May 4, 2010

I won, I won, I won....

I have been searching forever for Stamping Up French Script background stamp. I usually find them after the sale is over. I finally found three again...all listed on Ebay. I start bidding and some person keeps upping the bids and I lost out on the first one.

I was not about to lose out on the second one...so, I waited and I waited and I watched the time count down. I figured....she/he always ups me by $.50 so....I would go one further and go $1.00. I watch the time tick down....I entered my amount in the bid box....I kept my mouse on the button....when the clock said only 5 seconds left...I hit the button....and held my breath.

Nothing happened! I hit the refresh button and, and, and I won...I beat them out. I have my stamp. Now I have to wait for it to come in the mail. Tap, tap, rattity-tap (those are my fingers tapping). I have no patience...I want it now. I have a stamp to go with it....I have a card idea and I really, really want to make this card!

On the down side...our house is on a cement slap (no basement) and it has been raining so hard lately. Monday, I heard gurgling like water running and I followed the sound....got down on my hands and knees....knelt by the register and there is water in there!!! Our floor vents are full of water. Hubby has been pumping them dry with his shop vac but it is not keeping up to the water flow. I now need to find a general contractor to tell me what my next step should be. I want to rent again!!!

It is supposed to be hot and sunny for the rest of the week into the weekend....so, I hope we dry out and we can figure out what is going on.

I hope the sun shines where you are.

Cat

Monday, April 19, 2010

Time....

I will be so glad when tax season is over! I did four year-ends and I have three more to go before I am free!

I enrolled in Suzanne Dean's online Copic classes....you can find all the information here. I have taken a couple classes locally and by the time I was out the door, the information was out of my head. Here, I have a year to complete the course, videos to download and watch and keep to remind me and, after watching one of her videos, I finally get it about the numbering system.

I printed the Copic colour chart on each kind of paper I have and coloured them all in (to see the different effects paper has on the colours) and, while I was laying down my little colour blocks, I could see and understand why.

I was Googling for Copic totes and found some neat ideas. I stopped by Michael's after work and I found a very strong basket, leather trim, handles, straight sides and.....it fits all four of my Copic containers (I like having them in the original rack and in colour chart order). I am so pleased.

But, the good news is.......I bought a Bosskut Gazelle cutter! I can't wait! I posted on the Bosskut user forum about testing the double-sided sticky tape/cardstock/tape sandwich and a wonderful lady named Terri offered to try it out. Well, she also sent me the die-cuts so I could see for myself. I love it, I love it, I love it!

I have also been surfing for collapsible photo tents so I can have better pictures on my blog of things I make. I have found a couple of ideas and I picked up two lights from Home Depot that I hope will do the trick for lighting. I will post the results!

I went to my daughter's prenatal exam at the end of March and I got to hear my grandson's heart beat...yep, it is going to be a boy! I have some ideas for shower invitations and I get to work on them as soon as my last tax return is done!!!!

I haven't been too crafty lately....working and surfing. Hopefully I will have something to show soon....lots of ideas....painting 'scapes with Pan Pastels, new dies etc.

Have a great day and I hope the sun shines where you are.

Cat

Wednesday, February 17, 2010

I hear the call....

Dustin Pike posted on his blog a call to readers to send a card to 10-year old Delia in Denver Colorado, who was diagnosed with Acute Myeloid Leukemia. He generously offered one of his digital stamps free to anyone who wished to participate.

She loves...no, adores owls and that was what the stamp Dustin donated was ---owls. She has been inundated with owl-based cards from around the world wishing her well. I never seem to find the time but, I really wanted to do this.

So, I got my stamp...brought out the dreaded Copics (which I still have such trouble with) and did my best. I found glorious pink glitter paper to match the blue, brought out a Martha Stewart Edge punch (finally broke into my hoarded stash), added a computer generated sentiment, mounted it on a Spellbinder's tag, a matching bow and a jewel.

Sitting there last night watching the Olympics I thought ...okay, Owl...you are sick...you need bloodshot eyes. Then today I added Glossy Accents to the eyes. I think it looks pretty good myself! The inside is just a note telling her that good wishes are winging her way from this corner of the world.

Yesterday, I had some down time and as I surfed around on Becca's blog "Amazing Paper Grace" I saw what she did with an owl made from Nestabilities. I just had to do it!

Right after work I headed to Michael's to grab a note pad and I spotted this 5x7 hot pink journal. I couldn't wait to finish supper and out came my Big Shot, Nestabilities, paper, Distress Ink and stuff. As I did not have the Stamping Up punch for the head I had to "Google" an image of the die cut> print it out on my computer> cut the cardstock> trace it onto my paper and cut it out. Then I die-cut the other required pieces, did my very first distress-look, glued everything together and finished with adding googly eyes.

I really hope she likes it. Now, I just have to package it all up and stick it in the mail. I heard they released her from the hospital and she is resting at home now.


I have been so busy working that I really have not had time to think and I still have the wedding invitations to make by the end of the month. Then....I plan on digging out my Marianne Walker manual and figure out how to use these dreaded Copics without bleeding everywhere. I know it is me because I am using Prism paper and I am using Neenah Classic Crest paper everyone raves about and I still bleed.

Oh well...six medals...Go Canada Go!!!

Thursday, February 4, 2010

Updates.....

Phew...it has been awhile since I last posted...busy, busy, busy! Our first grandson arrived this past August and I just had to make birth announcements....man, why else have I been buying and hoarding all this stuff!

The kids had come for a visit and Jen and I sat down and she pre-picked out the announcements...we just had to wait to see if it would be pink or blue. In the meantine, I ordered the tiny clothespins off the internet and tried to find the perfect paper. I searched high and lo and could not find anything I liked or even looked remotely like the picture in the book.

So, back to creating digitally. I created the paper I wanted and just waited to see what colour I was going to use...simple! Same thing with the feet, I tried to find a stamp but again, on the internet and readily available in the US but, I live in Canada and getting US based card creation products up here.....good luck! Back to the computer....look for clip art....change the colour (gotta love my graphic programs!) and I had just what I wanted. On the inside - basic birth announcement but, I added tiny punched out baby feet as an embellishment.


My brother-in-law's father passed away and I wanted to send him something simple, but masculine. I saw this technique on another blog and I immediately thought of it for him. I searched until I found a clip art of a Thomas Kincaid painting...printed two copies, one black and white and one in colour. Using my Nestabilities I die cut the colour picture and used a black marker to outline the die-cut. I then, carefully, matched it to the black & white printoff, printed a computer generated sentiment, mounted it and added two eyelets for the string to go through. I lined the envelope to make things more special for him.


Christmas cards (I know, I know...a bit late but, better late than never).

Baby's First Christmas...when I spotted these 3D sheets I just had to do one for our new grandson. I had not done one before, even though I have tons stored (alright, hoarded!) and I have wanted to do one.


My camera sucks...hopefully, in the near future I can replace it. The colours are so much richer...I used green velvet mounted on gold mirrored paper and then mounted on red velvet. The sentiment was printed on my laser printer and then die-cut, the ribbon was beautiful
Christmas ribbon threaded through each end.

I only took pictures (me bad) of one of the Christmas cards I sent out this year...and I did four styles. Debbie, who taught the Prisma colour class and the Copic class always says to photocopy the originals and use the photocopies on your cards...man, after colouring twenty cards I sure see her point and will most definitely do that in the future! If I find the time, I will recreate them and post them here...I am so proud of them!


This one I used a 3D Pointsetia sticker on acetate, double-sided tape, red glitter and cut each piece out to form the flower. I then ran the background through my CB embossing folder and my Scor-Pal to form the base for the sentiment. Again I used stickers but, this time the gold "Merry Christmas" was on two lines so, I very carefully cut the welding to use it on one line...some glittery ribbon and a small bow to finish it off.

Man, I have had this 3D sheet in my computer for a couple of years looking for the first opportunity to use it. Lo and behold, we get an invitation to a birthday party! My "nephew of the heart" is turning 50! Yeah, I get to use this sheet and I get to roast him at the same time....life is good!


Again, my camera sucks and the green paper colour does not come though! It is a glorious, rich yellowish green and really rocks with the deep colour of the blue. There is five layers to this 3D sheet and I had to cut them out individually, man my wrists are still hurting! A simple die-cut with Nestabilities circles to form the "50", Spica to the shorts and dumb bells...and I have a perfect card for Shayne!

Valentine's is coming up soon and as I wanted to make a card for Nolan....Hey, I can make lots of holiday cards for him....Valentine's Day, St. Patrick's Day, Easter etc. and, to top it off, we have another grand baby on the way! Both babies will have birthdays pretty close to each other, just one year apart! More birth announcements, more baby cards...yahoo!!!!

Another free "print your own" 3D sheet from the internet (and, thankfully, there are thousands of free sheets out there), sat down to cut out the layers while I watched TV and I have just the right card for our grandson. The hearts in the corners are from a punch and I used Spica on them plus the bears, flower graphic, around the heart and the writting on the heart.


I absolutely love 3D sheets and I can't wait to make some more but, I think the pre-printed ones are so much easier to use. I will still use the free ones on the internet but, I will try to pick out ones that are easier for me to cut!

Well, I have more to do so I will try to get them posted sooner rather than later. I hope everyone is having a great day.

Cat